The 120 °c to 150 °c band is a material boundary, not a convention. Process and platen heating, adhesive curing, epoxy-encapsulated plates at their limit. Silicone and polyimide are comfortable here; the encapsulant, not the element, is usually what constrains the design. This page covers what that means for etched foil polyimide heaters, which is rated to 200 °C continuous.
What the 120 °C to 150 °C Band Requires
Process and platen heating, adhesive curing, epoxy-encapsulated plates at their limit. Silicone and polyimide are comfortable here; the encapsulant, not the element, is usually what constrains the design.
| Band | 120 °C to 150 °C |
|---|---|
| This construction, continuous | 200 °C |
| Limited by | polyimide film |
The band sits comfortably inside the 200 °C ceiling, which is where a heater should be specified: the margin between the working temperature and the insulation limit is what absorbs a poor thermal path, a warm ambient and a control overshoot without shortening the life of the part.
Why the Boundary Is Where It Is
150 °C is the ceiling of filled epoxy, and on an encapsulated plate the encapsulant fails before either the element or the plate is troubled. It is also roughly where acrylic pressure-sensitive adhesives give up, which matters on any heater that is held on by its own adhesive rather than clamped.
Silicone and polyimide are comfortable through this band with 50 °C of margin in hand; the constraint is usually the bonding system, not the heater.
What an Etched Foil Polyimide Heaters Is
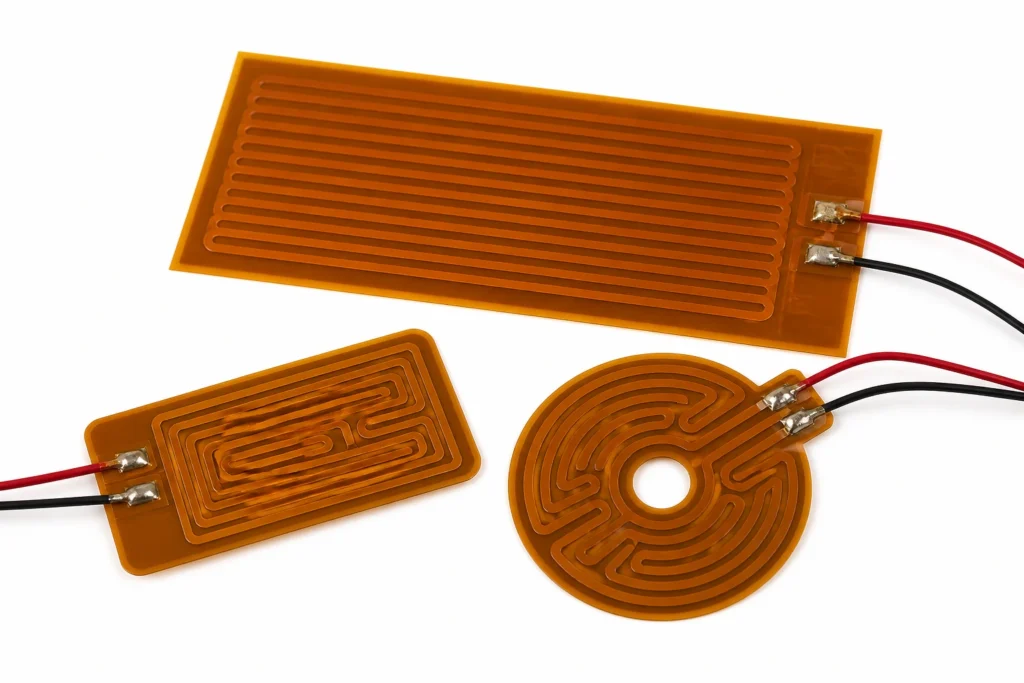
Precision-etched circuits with varied trace width across the outline, for temperature uniformity better than ±1 °C on instrument and optical assemblies.
A photo-etched copper or Inconel foil circuit laminated between polyimide films, 0.2 to 0.4 mm thick in total. It is the thinnest and fastest flexible heater made: almost no thermal mass of its own, so what it heats is the part rather than itself. It will wrap a cylinder; it will not take a compound curve, and a nick in a 0.05 mm film propagates from the edge, so outlines are drawn with radiused corners.
The heat leaves through the bonded face. Everything that is not in contact with the load radiates and convects from the back of the heater instead, which at these thicknesses is a poor path — so an air gap under part of the outline is not a small loss of efficiency, it is a hot spot at that spot.
| Element | photo-etched copper or Inconel foil |
|---|---|
| Insulation system | polyimide film |
| Total thickness | 0.2 mm |
| Maximum size, one piece | 300 x 500 mm (one piece) |
| Continuous working temperature | 200 °C |
The continuous limit of 200 °C is set by polyimide film. The element alloy would run far hotter; it is never the element that decides.
Which Temperature Is Being Held
Three temperatures matter and they are not the same number: the element temperature, the temperature of the surface being heated, and the ambient. A heater rated for a continuous working temperature is rated at the element — the hottest point in the assembly, and the one nothing on the outside is measuring.
The gap between element and surface is the thermal path. Bonded to metal it may be a few degrees; across an air gap, a void in the adhesive or a dry clamped joint it can be tens of degrees, and every one of them appears at the element rather than at the load.
Which is why sensor position is a drawing item. A sensor laminated into the heater protects the heater; a sensor on the load controls the load. Assemblies that have to do both carry two: a control sensor where the process is, and a limit device against the element.
Uniformity across the heated face is u00b11 u00b0C achievable over the heated area with a profiled circuit, achieved by varying the element pitch across the outline rather than by adding wattage — the cold corner of a heated plate is a layout problem, and more power makes the hot part hotter.
Attachment and Thermal Contact
Attachment options are a factory-applied pressure-sensitive adhesive, vulcanising or bonding to the customer's part, or mechanical clamping with a plate or a strap.
A PSA bond wants a clean, dry, degreased surface, continuous pressure while it wets out, and no trapped air: a bubble under the element is a spot with no thermal path, and it will be the first place the heater fails. Acrylic adhesives reach full strength over 24 to 72 hours, so the assembly is not at its rated watt density the moment it is pressed down.
On a 0.2 mm film the adhesive is a meaningful fraction of the total stack and of the thermal resistance. It is also the temperature limit of the assembly in most cases: acrylic PSA is comfortable to about 150 °C, well short of what the polyimide itself will take, so a 200 °C duty needs a silicone adhesive or a bond made by the customer.
From the capability table: Free, 3M PSA backing, or bonded with a two-part thermally conductive adhesive.
The bond line is part of the thermal circuit and should be specified like one. A 0.05 mm acrylic PSA layer conducts roughly 0.2 W/m·K; a filled silicone adhesive is two to five times better, and a bolted joint with an interface pad better again. Whatever is chosen, it has to be continuous — the heater cannot spread heat sideways to cover a gap, and the temperature under a void rises until something in the stack gives way.
Control and Protection
This heater has no way of limiting its own temperature. Resistance heating draws roughly the same power whatever the temperature, so with the load removed, the fluid gone, the fan stopped or the sensor open circuit, the element keeps producing watts until something stops it.
The design must therefore contain a control device and, separately, a protective one: a controller with a sensor to hold the set point, and a bimetal thermostat or a one-shot thermal cutoff wired in series with the element to open the circuit if the loop ever fails. The two are not interchangeable — a controller that has lost its sensor cannot protect anything, which is exactly the fault the cutoff exists for.
Sensors can be built into the part: NTC thermistor, PT100 or PT1000 RTD, or a K-type thermocouple, fitted under the same insulation and tested with the heater as one assembly. A sensor laminated into the heater reads the heater; a sensor on the load reads the load. Both are legitimate, and the drawing has to say which is wanted.
Where This Construction Is the Wrong Answer
- Do not plan on running above 200 °C. That ceiling belongs to the insulation system, not to the element alloy, and it is not a figure that derating extends — past it the insulation degrades and the dielectric strength goes with it.
- Do not specify polyimide for continuous steam or repeated autoclave cycles — it hydrolyses. Do not fold it to a tight radius, and do not put a sharp internal corner on the outline.
- Do not rely on the insulation as a seal in a wet installation. Where washdown or condensation is expected, the assembly is sealed at the edge and at the lead exit, and both are drawing items.
Other Constructions That Hold 120 °C to 150 °C
Constructions in this catalogue that will hold 120 °c to 150 °c continuously:
How to Specify One
This is a made-to-drawing part, so there is no catalogue number to quote. A quotation is built from the following, and the more of it that arrives with the enquiry the fewer rounds it takes:
- An outline drawing, or a sketch with dimensions: overall size, holes, cut-outs, radii and the lead exit position.
- The supply voltage, and whether it is AC or DC. The element is wound for one voltage; it is not a switchable range.
- The power required, or — better — the temperature to be reached and the mass or flow it has to be reached in. Given the second, the wattage can be calculated instead of guessed.
- What the heater is attached to, and how. This is what decides which watt density figure applies, and it is the question a quotation cannot proceed without.
- The ambient, and the lowest temperature the assembly must start from. A heater sized for a 20 °C start is undersized for a -30 °C one.
- Duty cycle: continuous, intermittent, or a warm-up to a deadline. Time to temperature is a specification, not a by-product.
- Sensor and protection: which sensor, where it goes, and which limit device is fitted in series with the element.
- The certification the end product is built to, named on the enquiry rather than after approval.
- Quantity and target price, because the construction that is right for fifty pieces is often not the one that is right for fifty thousand.
- Whether adhesive backing is wanted, and what surface it goes onto — a low-energy plastic needs a different adhesive from bare aluminium.
Lead time: Samples 7-10 days from approved drawing; production 15-20 days.
Etched Foil Polyimide Heaters — Capability Table
These are process limits for the construction, not the specification of one stocked item. Every line is what the factory can hold; what your part holds is fixed on your drawing.
| Parameter | Specification | Limit / note |
|---|---|---|
| Construction | Photo-etched copper or Inconel foil circuit laminated between polyimide films with a high temperature acrylic or FEP adhesive | Decided at quotation from the outline and the wattage |
| Insulation system | Polyimide film, 0.05 mm or 0.125 mm per face | This is what sets the temperature limit, not the element |
| Total thickness | 0.2 mm | Nominal, before adhesive; add 0.2 mm for PSA backing |
| Minimum size | 10 x 10 mm | Below this the element cannot be routed with a safe edge margin |
| Maximum size, one piece | 300 x 500 mm (one piece) | Larger areas are supplied as tiled zones with separate circuits |
| Dimensional tolerance | u00b10.5 mm on dimensions up to 200 mm | On the die-cut outline; hole positions are held tighter |
| Supply voltage | 5 V DC to 240 V AC, wound to order | Wound to the ordered voltage u2014 it is not a switchable range |
| Resistance tolerance | u00b110% standard, u00b15% on request | Measured at 20 u00b0C; hot resistance differs with the element alloy |
| Watt density, free air | 0.8 W/cmu00b2 typical, 1.3 W/cmu00b2 maximum | Nothing conducting heat away u2014 the honest figure for an unbonded heater |
| Watt density, bonded to heat sink | 7.5 W/cmu00b2 maximum | Only valid with full-area contact to metal; specifying at this figure and running in free air destroys the heater |
| Continuous working temperature | -200 u00b0C to +200 u00b0C continuous (+220 u00b0C short term) | Of the heater itself, measured at the element, not the ambient |
| Dielectric strength | 1500 V AC, 1 minute (2500 V AC on the 0.125 mm film build) | One minute, element to any exposed surface, no breakdown |
| Insulation resistance | greater than 100 Mu03a9 | At 500 V DC, measured after the dielectric test |
| Lead wire | PTFE or silicone insulated 24 AWG to 20 AWG, or an FFC tail etched as part of the circuit | Length, gauge and termination to your drawing |
| Attachment | Free, 3M PSA backing, or bonded with a two-part thermally conductive adhesive | Adhesive-backed heaters need continuous contact pressure while curing |
| Sensor and control options | NTC 10K B3950, PT100/PT1000, K-type thermocouple, KSD9700 bimetal thermostat, thermal cutoff | Fitted under the same insulation and tested as one assembly |
| Certifications available | UL 499 construction, IEC/EN 60335, UL 94 V-0, RoHS, REACH, CE, ISO 13485 QMS | Constructions are built to these; the certificate covers the construction, not every outline |
| Uniformity | u00b11 u00b0C achievable over the heated area with a profiled circuit | Achieved by trace geometry, and it is designed per outline |
| Circuit tolerance | Trace width held to u00b10.05 mm | Which is what makes the resistance repeatable from lot to lot |
Capability figures are this factory's process limits for etched-foil polyimide construction. The 200 °C continuous limit and the watt density ceiling (to about 7.75 W/cm² with heat sinking) are properties of the polyimide film and the adhesive system, and are published consistently across the industry.